FEATURES
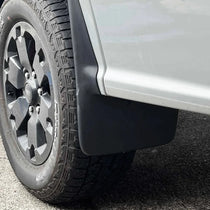
- 【Complete Protection】: Keep your Tesla Model Y safe from dirt, rocks, mud, snow, and other road hazards with these custom-designed Mud Flaps. They shield your car’s lower body, preventing scratches and scrapes caused by flying debris.
- 【Premium Material】: Constructed from a tough blend of PP+TPE, these splash guards are both impact-resistant and flexible. Designed to perform in all weather conditions, they provide long-lasting protection in even the harshest environments.
- 【Protect Tires and Paint】:These splash guards help extend the life of your tires by preventing debris from damaging the rubber. They also reduce paint wear, keeping your car looking pristine and reducing the need for frequent washes.
- 【Drill-Free Installation】: Enjoy easy installation with no need for drilling. The mud flaps are designed to fit perfectly using existing holes in your vehicle, and the included clips make securing them quick and hassle-free.
- 【All-Inclusive Kit】: Includes 4 mud flaps and all necessary hardware for seamless installation and full protection.
COMPATIBILITY
- Suitable for 2019-2023 Tesla Model Y
PRODUCT DETAILS
-
All Weather Protection: Protect your Tesla from dirt, debris, and mud with our set of 4 mud flaps, ensuring a perfect fit and maximum protection for your Tesla.

-
Durable and Flexible: The mud flaps are made from long-lasting and flexible PP+PTE materials that resist all weather conditions and won't damage the paint over time.

-
Not damage the paint: The mud flaps are so flexible that won't damage the paint or rub on the ground easily. They are designed to be mounted at a proper height and do not scrape when going over speed bumps.

-
No Drilling Required: All screw holes line up with original holes position.

- Built-in Buckle. The front flap has a built-in buckle for a tighter and more secure fit.

- Free delivery of installation clips, you can also use the original car clips.

PACKAGE LIST
- 2 front mudguards
- 2 rear mudguards
- Hardware for fast installation
INSTALLATION
- Step 1: Unscrew the original car screws at the location to be installed
- Step 2: One-to-one correspondence according to the directions marked on the mudguard
- Step 3: Install the screws (need to force the screws in)
- Step 4: Check to make sure the screws are all fixed


